
 |
| (source) |
"The study of effects, because discontinuous, appear as occultism"
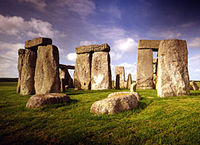
Dutifully reading my McLuhan this morning, I came across his observation that "the study of effects, because discontinuous, appear as occultism."* How similarly does this statement echo my own thoughts a few years ago. On my Shakespeare course in England I visited Stonehenge with some classmates. Our guide, a self-described "Neo-Druid" with curly springy hair, shared its mystical history as a burial, ritualistic, and commercial hub positioned over intersecting ley lines. These lines imbue the sacred site with power that she proceeded to demonstrate with her L-shaped divining rods that, pulled by their invisible energy, crossed and recrossed as she passed over them.
As skeptics we were immediately prone to dismiss our Neo-Druid guide's assertions as self-fulfilling or occult gibberish, but I couldn't help but consider the veracity of what she was saying. Why wouldn't her experience with magnetic fields, etc. be valid? Mightn't the phenomenon of the rods be based on some natural principle as yet mysterious but perfectly inane? Are we erroneously labeling something as occult because we have not yet grasped the underlying cause, the connection of this process with that process?
As skeptics we were immediately prone to dismiss our Neo-Druid guide's assertions as self-fulfilling or occult gibberish, but I couldn't help but consider the veracity of what she was saying. Why wouldn't her experience with magnetic fields, etc. be valid? Mightn't the phenomenon of the rods be based on some natural principle as yet mysterious but perfectly inane? Are we erroneously labeling something as occult because we have not yet grasped the underlying cause, the connection of this process with that process?
But then, why should a natural phenomenon feel less threatening once it has been investigated, labeled, and replicated in some obscure scientific journal, even when quantum chromodynamics is as mysterious to me as chronomancy? Whether justified or not, I feel safe in Science but threatened by Mystery. I still tend towards close-mindedness in such matters—indeed, when our hostess at Kinnersely Castle started on about dowsing, shamins, mugwort, etc, I was reasonably alarmed. The occult is certainly a door I would not like to open, especially since I know it is real based off of an acquaintance's experience (and for that reason I will not go near a Ouija board). I wonder, then--is it the associated traditions that cast practices like dowsing as evil? the practitioners? the purpose?
*McLuhan and McLuhan, Laws of Media: The New Science (1988), p. 51
P.S. divination can be practical


